Pinspired: Baby Blanket Ladder


Little One was blessed to receive many blankets in preparation for her arrival, including some beautiful handmade pieces. My mom mentioned an idea like this and I said that I knew I had seen it somewhere before. Funny enough, a few weeks later I was perusing my boards (what, you don’t browse your boards for fun?) and found that I had pinned it at least a year earlier! I explained my idea to the Hubby and thankfully he agreed to make it for Little One’s room.
 
Project Time: 2-3 hours
Project Cost: approx $20
Pin it or forget it? Pin it*
 
*I will say the Hubby handled this project completely from start to finish and at the end, he wasn’t thrilled how it came out (although I was). So please consider that when deciding to take on the project.
 
The Hubby made this with two pieces of wood (I’m not sure on the specifics of sizes) and dowel rods. We decided on a nice cream color to paint the sides, since we thought that a color might draw attention away from the beautiful blankets. The rods didn’t need painted since they would be covered. 
 
I love how her blanket ladder turned out! It is one of my favorite pieces in our house. It’s a great display for some of her blankets, adds decoration to her room, and doesn’t take a lot of space. If we had more room, I’d ask the Hubby for another for our blankets… but even 6+ months later I’m not sure he has recovered from making it. 

Book Bites – Minimize the Mess (with Giveaway!)


I am so very excited to be a part of the Blog Tour for the book Minimize The Mess! I wish you could see my copy of this book. Nearly every page has a highlight and notes in the margin. There is so much great information tucked away for simplifying your home in this lovely book. 

Since I became a work-at-home mom, my sensitivity to clutter and mess in our home has increased. While I was already on a quest to find the best way to optimize our smallish home and declutter our lives, being at home more is definitely pushing me to work on this more. Reading this book could not have come at a better time! 

While not all of the information in this book is new to me, I found the information that Rachel shared wonderfully packaged to help me think through application for my home. There is prodding to really examine your home and life and the motivation behind the mess, but it is done with the spirit of a trusted and understanding friend.  Not only will you be encouraged to work on the current state of your home, you’ll find ways to change the way you think about what comes into your home in the future – the true key to keeping your home the way you want. 

Want to join me in minimizing the mess in your home? You can get your own copy of Minimize the Mess for only $2.99 (what a deal!) from Rachel’s site or from Amazon. If you’re purchasing from Rachel’s site she is offering a 25% discount with the coupon code launch.


I received a copy of Minimize the Mess for free to review for you. My thoughts and opinions are all my own. 

DIY No Mess Easter Grass

Update: 

I can’t even decide what the best part of this no-mess Easter grass is!

First, it’s no-mess. No more plasticy strands clinging to everything in sight and showing up weeks after the basket is put away.

While I totally love this lime green color, it can be customized to match the little one’s basket!

It’s reusable! No more spending each year on something that’s just going to go in the trash.

It’s even washable! Have an unexpected melty chocolate in your basket? Throw this grass in a laundry bag and wash it up for next year.

I’ve really loved this Easter grass both years we have used it in our family. This year I created a video to show how to make your own Easter grass. You can see it here: 


Original Post:


Do you ever finish a craft project and get super excited because it turned out great? That’s how I felt with my Easter grass project. When I started making Mudpie’s Easter basket I thought “wouldn’t it be cute if I sewed in some yarn ‘grass’?” I contemplated this for awhile and since I’m trying to go with the “let’s not overly complicate something that has already been done” technique I decided to look around and found this post from Lady Behind The Curtain (http://www.ladybehindthecurtain.com/making-grass-from-yarn/) that I based my Easter grass on. I didn’t use the plan exactly but it helped having that idea to go off of. It wasn’t difficult but took much longer than I expected. I kept reminding myself that this is a project that will hopefully last through her young years at least since I get frustrated when projects take longer than expected. When I got all the grass poofs done and in the basket I was so excited. They were the last touch I needed to really love the basket it seems. I’m so happy with how it turned out!


Here’s how to make your own DIY No Mess Easter Grass: 

Pick your favorite color acrylic yarn. I used neon green, but I also think hot pink would be super cute. You’ll also need scissors and something to wrap the yarn around. I used a small container of labels I had but an old gift card would be perfect as well.

Hold one end of the yarn and wrap the yarn several times. I found 45 times worked great for me. Cut the end of your yarn.

Slide a piece of yarn under your yarn wraps and tie a very tight knot in the middle of your yarn. Do not cut yarn.

Carefully slide wraps off onto your hand. Slide your scissors in the middle of the wraps and cut the loops across from your knot. Hold on to the knot area while doing this if you can.

 
At your knot hold the yarn strands together and wrap the tail of the knot around the bundle around 5 times. Use the other end of the knot tail to tightly knot these threads. 
 
 
Congrats you’ve made your first Easter grass poof! Now keep going until you have enough Easter grass to cover the bottom of your basket. 
 
 
I thought that I might try to connect the grass to the bottom of the basket or connect the grass poofs together, but I ultimately opted not to. Since this Easter grass is no mess, I don’t mind if baby girl decides to throw the poofs all about when she gets older. Plus this way I can take out the grass if I need to later for any reason. 
 
What do you think of this DIY Easter grass? Does traditional Easter grass end up in odd places in your house or just mine? Let me know in the comments below! 

Mudpie’s Crochet Easter Basket


While there are many beautiful Easter baskets on market these days, I knew that I wanted to crochet Mudpie’s first Easter basket for her. I loved the idea of it being her “main gift” this first Easter and something that could be used for several years as she grew. While I probably could have figured out a pattern on my own, I try to remember that it’s silly to reinvent the wheel and set out on my own Easter search. 


I found this adorable pattern by Jam made that was just the style I was looking for. I decided to use the yarn I had left over from her baby blanket as the color pallet. I had bought extra of each color to have for other items for her since I think it’s fun that many of her items coordinate. 

 
The pattern is simple and delightful to work up. I haven’t worked with two strands of yarn at the same time before, but was surprised to find that it wasn’t nearly as difficult as I thought it would be. Working with two strands created a nice and sturdy basket. The handles are sturdy too, although I find that when lifting it from the handle the basket bends just slightly so I’m thinking about maybe adding a cardboard base next year. For this year it’s fine though. I think the size works well – small but still large enough to fill with goodies or eggs. I even added an extra element not in the pattern that really pushed this project over the edge into “Love!” land for me. I’ll share that and what is going to be in Mudpie’s basket this year a little later in the week, so stay tuned! 

Three Fun Things to Do When You Find Out You’re Pregnant

As soon as you find out your pregnant, it feels like the onslaught happens. You start to see articles everywhere about getting ready for baby. People start sharing their advice for you. And the moment you purchase your first baby item you start to get all sort of targeted mailers about pregnancy (despite my marketing degree, I’m still not sure exactly how this happens even if you don’t give your address, but it seems to). So I’m not sharing about what “they” say you should do when you find you’re pregnant. I’m sharing a few fun things that I did early in my pregnancy that I’m glad I decided to do.

1. Sign up for a mailing list (or two), but make sure they align with what you want to know.
I promised myself (and the Hubby) that I would work hard to avoid as much as I could about scary pregnancy stories. I deal with hypochondria (and overactive imagination) in my mind and knew it would not be helpful to anyone in my family if I got worked up over the worst case scenarios.  I limited my weekly readings to a mailing list that focused on my baby’s development (My Pregnancy This Week from BabyCenter), a clever book my mom found at a yard sale (The Pregnancy Countdown Book), and the wonderful and funny mailing list that almost always shares something I’m going through that week (Alpha Mom Pregnancy Calendar).  It’s really fun reading each week about what is going on in my body and I’ve found in surprisingly comforting when the information I’ve read matches up with what I have experienced (Oh you mean that heartburn I’m feeling is right on time? Good to know!).


2. Start noting down at least a few things going on with you to look back on.
I haven’t gone crazy recording down every little thing in my pregnancy,  but I have tried to note down the big things (like the first time Daddy felt her kick and when we announced her name to the world).  I also started doing weekly bump photos at about 11 weeks. I started a digital baby book in Evernote (more on that later) where I’ve been saving everything. I hope to put some of these notes together to print out in a legit baby book sometime but at least I have them saved for now. Even though she’s not here just yet it’s amazing how far away some of the things from the beginning of my pregnancy feels and it’s fun to be able to go back and look at those things now.


3. Figure out how you want to share what’s going on with your framily. 
It’s hard to keep track of who you have shared what with. There are a lot of of great options for sharing your updates and photos and it can be a tough decision.


After much consideration we decided we would share via a private Google+ page. No matter what way you decide to share with your close people, go ahead and start sharing those fun updates and photos. Those who are interested will love it and it. It will give you a great way to connect with those people.


Little One’s Blanket


When I got to the stage that my friend circle began having babies, I decided I really wanted to have a standing gift that I could give to welcome all the kiddos into the world. It needed to be useful and able to be personalized for each family. And simple because, let’s face it, I don’t do well with complicated projects on a deadline and I’d prefer to give them to the mommas before the baby is born, not on their first birthday!


I decided on crocheting a small baby blanket that could be customized with the baby’s room colors. I make them in cotton or acrylic so that it can be used and washed. Typically I make them from the Tiramisu Baby Blanket pattern, which is a really beautiful pattern, but I have ventured into some different designs as well. I love that I can make the blanket special for each family and pray over that child while I’m crocheting. It makes it feel like I can stitch a little extra love for them.


When I found out I was expecting Little One, I knew she needed to have her own special blanket made by Mommy. I knew she would be getting several baby blankets (and she did get some beautiful ones from people who love her already) so I decided to make her a blanket that will fit her bed when she’s a toddler and will be big enough to wrap around her when she can toddle in to watch tv with Mommy and Daddy on the couch.


I decided on the Granny Stripe Blanket pattern, since it was a pattern that I’ve been eying for awhile. It was really a wonderful pattern and a joy to make, even at a larger size. I usually get downtrodden about halfway through big projects like blankets, but did not with this pattern. Surprisingly enough, I was even able to get this done before her baby shower!
I also took my time picking the colors. This was the first time I’ve really used Pinterest to pin color pallets and narrowing down what I wanted the feel of her room to be like. When I got word that Little One was a she, I finalized my plans and picked out the yarn at Hobby Lobby. They have beautiful colors in “I Love This Yarn” that are reasonably priced and feel nice and soft.
 
 
Overall I’m very happy with how it turned out. I’d like the edging to look a little smoother, but I can deal with that. I love the reverse crab stitch that I used on the outermost edging. The colors are bright and remind me of a fun woodland scene, which is what I was going for. Hopefully Little One will like it just as much!
 

A Simplified Wardrobe While Pregnant


In November of last year I documented what I wore for the entire month (you can see my outfits here). I had cut back on my wardrobe just a bit and I really enjoyed the process of actually seeing what I was wearing each day. Surprisingly, the outfits seemed to look better on me in the photos than I felt that they did when looking in the mirror (good angles maybe? I’m going to go with I probably look better than I think I do most days). I liked making combinations from fewer clothes. I had mentioned to some friends that I was considering trying Project 333 for the Spring or Summer.

And then I got pregnant.


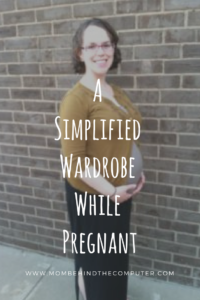
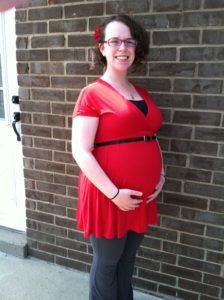
No one but us knew we were expecting when this photo was taken, but I was already in need of new clothes to fit my changing body!

Since I was already close to not fitting in my clothes, I immediately had to go out and buy a few stretchy items to get me through until we started telling people and I could request my thrifty momma watch out for deals at the clearance racks, thrift stores and yard sales (she’s since provided me with at least 75% of my pregnancy clothing from there!). I felt frustrated at the thought of trying to figure out how to thriftly clothe my changing body over the next year (let’s face it, things are still going to be a little complicated clothing-wise when the little one comes).

My mom found me this great skirt on clearance. 

But the process has been more smooth than I expected and I’ve learned a lot about dressing simply and with less through the experience. Here are some tips that have worked well for me while trying to clothe my ever-changing baby-growing body.

1. Visit your thrift shop down the road…

I haven’t bought much new since becoming pregnant. A few pieces that I have gotten a lot of use out of, but for the most part maternity clothes (like everything “special occasion”) seem to be overpriced. Plus, I feel like I don’t know what my body is going to be like in a few months and I don’t feel like paying $20 for a t-shirt that may or may not fit. My aforementioned momma has been great at helping me find clearance, thrifted, and yard-saled items at great prices.  Most are in great shape and, if they don’t fit very well, I don’t feel guilty putting them away for after the baby arrives or passing them on.  

My Sister-in-Law helped me find a great on some maternity tops (including this one) on a Facebook yard sale group she is in.

2. Re-organize and store your “old” clothes.

While you can probably still use many items for long into your pregnancy (I’m currently wearing two pre-pregnancy shirts right now), you won’t be able to comfortably fit into everything. Don’t let those pieces clutter your closet and choices. Get a nice plastic bin and pack those away for the time being. Once I got those clothes out of the way, I found it a lot easier to re-organize how I stored my clothes. I’ve loved this since it makes finding clothes to wear easier than before!

3. Keep it clean.

I’ve recently began the habit of doing a load of laundry each day (or so). This keeps my favorite pieces always fresh and clean and ready to be worn. While I’m not against getting a few wears out of clothing, the summer and being pregnant means that isn’t happening right now. Staying on top of the laundry means I can wear my super comfy maxi skirt to work each week if that’s what I want.

4. Don’t be afraid to invest in great pieces.

I’m certainly not for breaking the bank, especially when your body is changing all the time, but if you see a good investment piece don’t pass it up. The skirt pictured below was purchased at full price, but I’ve worn it at least once a week during my pregnancy so I’ve definitely gotten my money’s worth out of it. I’m expecting to be able to use it for at least a little bit after the Little One comes as well.

I love maxi skirts now that I’m pregnant. I may never go back!

While I’m not officially doing Project 333 since being pregnant, I am dressing with less for sure. The whole process has surprisingly made me feel even better about trying Project 333 when my body finds its way back to normal. Courtney also offers a micro-course about dressing with less that I may try to kick off my new wardrobe when that time comes!

(This post does contain an affiliate link, meaning I’ll benefit if you purchase from this link, but there is no added cost to you. The thoughts and opinions shared on this post are completely my own!)